Adding and managing appointments
PERMISSIONS All Users can manage their own appointments. To manage appointments for others in the Dispatch Calendar, Left Navigation Menu > Admin > Admin Categories > Features & Settings > Application-Wide (Shared) Features > System Settings > Service Desk > Allow users that can view all tickets to see, edit, and schedule project tasks in Dispatch Calendar must be selected.
NAVIGATION My > Miscellaneous > Calendar
NAVIGATION Calendar > Dispatch Calendar
Appointment are time slots scheduled for non-company related activities such as meetings or personal appointments.
All Autotask users are able to add, edit and delete appointments for themselves. These appointments will also appear on the Dispatch Calendar.
Appointments for scheduled items are color-coded light pink. Dark pink indicates requested or approved Time Off.
All users can schedule appointments on their Autotask Calendar. By default, you can only schedule, edit or delete your own appointments.
NOTE If Left Navigation Menu > Admin > Features & Settings > Application Wide (Shared) Features > System Settings > Service Desk > Allow users that can view all tickets to see, edit, and schedule project tasks in Dispatch Calendar is checked, appointments, including private appointments, can be managed by the dispatcher in the Dispatch Calendar.
Appointment information differs slightly between scheduled items and requested or approved time off.
- Scheduled items have a scheduled time and appear in a time slot. The time slot displays the appointment name and description. Hover over the appointment to display a tooltip that contains additional information. A right-click menu provides additional options.
- A recurrence symbol indicates that the appointment is part of a series of recurring appointments that were imported from Outlook. Recurring appointments cannot be scheduled in Autotask.
- Time off requests and approved time off might not have a scheduled time. Unscheduled time off appears on the scheduled day as a dark pink time slot at the start of the day's schedule. Scheduled time off shows as dark pink on the in the appropriate time slot. The slot indicates the number of hours requested and whether or not the time has been approved.
NOTE Time off is requested and approved in Left Navigation Menu > Timesheets. You cannot manage time off on your calendar or in the Dispatch Calendar.
How to...
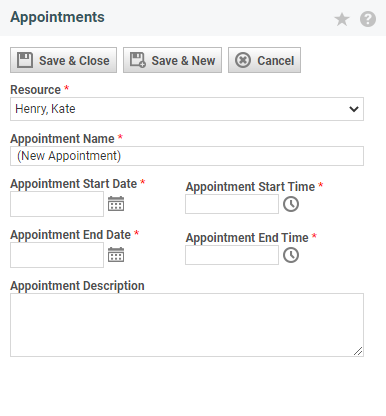
- To open the page, use the path(s) in the Security and navigation section above. Right-click on a time slot and select New Appointment. Dates and times will be pre-populated.
Or, go to New > Appointment on the Calendar or Dispatch Calendar sub-navigation bar. Dates and times will not be pre-populated:
- Complete the fields as described below:
| Field | Description |
|---|---|
| Resource* | This field is only enabled if you are creating an appointment for another resource. Select the Resource Name. If you opened this page from a resource's schedule on the Dispatch Calendar, the resource's name will be pre-populated. |
| Appointment Name* | Enter the title of the appointment. |
| Appointment Description | Optionally, enter a description of the appointment. |
| Start and end Dates and Times* | Enter the Appointment Start and End Dates and Times, if they are not yet populated. As best practice, enter dates and time in the same format that is used for display in the interface. If you use a different format, for example, you enter dates as MM.dd.yy, and Autotask displays dates as MM/dd/yyyy, Autotask will attempt to interpret and display the data. If Autotask cannot do this, the data will not be accepted. For more details, refer to Date and time entry format rules. NOTE Appointments can span more than one day. |
- Click either Save & Close or Save & New.
The Appointment page can be launched from the Autotask MS Outlook Extension. It isn't necessary that Autotask be open, but Microsoft Outlook must be open, and the MS Outlook Extension must be configured.
- From the Autotask menu in Outlook, select Add Appointment or click the Add Appointment button from the Autotask sub-menu.
NOTE From Outlook, you can only create appointments for yourself. The Resource name field will be pre-populated with your name and will be disabled.
- Create the new appointment just as you would in Autotask, and click Save & Close.
TIP Calendar items created in Outlook can also be sent to the Autotask calendar. Refer to Sending Outlook calendar items to Autotask.
- Right-click an appointment on the Calendar or Dispatch Calendar.
- Select Edit Appointment.
- Edit the information in any of the fields.
- Click Save & Close.
- Right-click an appointment on the Calendar or Dispatch Calendar.
- Select Delete Appointment.
- Confirm the deletion. Deletion cannot be undone.
Recurring appointments are created in Outlook as a recurring calendar item. If your company has the Autotask MS Outlook Extension enabled, you can then send recurring calendar items to Autotask, and they will be displayed on your Autotask Calendar and the Dispatch Calendar. For more information on the Autotask MS Outlook Extension, refer to The MS Outlook Extension.
Recurring Appointments imported from Outlook are distinguished by a recurrence symbol below the appointment time.
TIP You will not be able to edit a series of recurring appointments in Autotask. You can edit each individual instance, but any changes you make will not be written back to your Outlook calendar. For this reason, we recommend that you make any changes to a recurring appointment in Outlook and then use the Send > Calendar Items option to refresh the Autotask calendar.
When you delete a recurring appointment, the system will ask you if you want to delete only this instance of the appointment, or all instances in the series.
Click a radio button to make your selection, or cancel the deletion.
TIP You may want to delete the same recurring items in Outlook, because the Autotask deletion will not be reflected in Outlook.


