Managing the Quick Ticket feature
PERMISSIONS Security level with Admin permission to configure Client Portal & Taskfire. Refer to Admin security settings.
NAVIGATION Left Navigation Menu > Admin > Admin Categories > Extensions & Integrations > Client Portal & Taskfire > Global Settings
The Quick Ticket is a very simple form used to create and submit tickets via the Client Portal and Taskfire. Users will be able to create and submit tickets with only a ticket title and a description.
A Taskfire administrator must enable and configure this functionality for their own users, but Autotask Administrators can enable and configure Quick Tickets for all their non-Taskfire Client Portal users.
The Quick Ticket feature can be managed on a global level or on a per-client basis.
- To open the page, use the path(s) in the Security and navigation section above.
- Click the Manage Global Quick Ticket Settings (non-Taskfire Clients only) link.
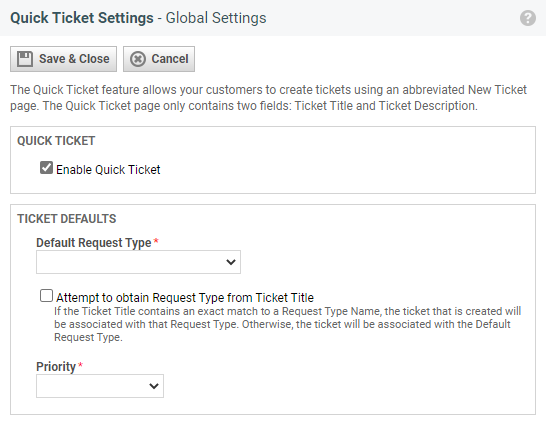
- Select the Enable Quick Ticket check box (this will reveal additional fields).
- Select a default Request Type for new Quick Tickets.
- If you'd like Autotask to try to automatically assign another request type based on the ticket title, select Attempt to obtain Request Type from Ticket Title.
- Select a default Priority for new Quick Tickets.
- Click Save & Close.
NOTE This will enable the Quick Ticket feature for all non-Taskfire Client Portal users and apply the selected defaults to all Quick Tickets, regardless of the user who created them. To disable the feature or change the default settings for individual organizations, see the next section.
- Go to Left Navigation Menu > Admin > Admin Categories > Extensions & Integrations > Client Portal & Taskfire > Manage Client Portal Organizations.
- Click an organization name to open the Client Portal Organization Detail page.
- In the Quick Ticket area, determine whether this client will use the global settings or individual ones by selecting the appropriate radio button.
- To enable, disable, or customize the defaults for this client only, click the Edit link and complete steps 3-7, above.


